Showing posts with label how to. Show all posts

Thursday, 10 August 2017

Lovely Lavender Lemonade

{Erin Out about About} Lovely Lavender Lemonade

I LOVE lavender. This one time I frolicked in a British lavender field and had the time of my life.

Since then, I've been on the hunt for lavender fields in Canada and thankfully Krystal of Dine and Fash has created this handy dandy guide to lavender fields of Ontario. The lavender season is currently in bloom and I hope to be able to make it out to one of these fields this summer. (Oh so many things on that summer bucket list!)

With lavender on the brain I decided to attempt some lavender lemonade. I first had some at Mayfield Lavender and have had a yenning for it ever since.

Dude, that was three years ago! That's a heck of a long time for a yen.

Making lemonade is dead easy and honestly you can't get more summer in a cup than with freshly squeezed lemons and sprigs of lavender. Go on, give it a go.

{Erin Out about About} Lovely Lavender Lemonade

{Erin Out about About} Lovely Lavender Lemonade

{Erin Out about About} Lovely Lavender Lemonade

Needed:
Fresh lemon juice from about 10-12 lemons (2 cups)
Fresh lime juice from about 3-4 limes (1/2 cup)
15 1/2 cups water
2 cups sugar
7-10 sprigs of lavender (stems and all)
(garnish optional) lemon slices, additional lavender sprigs

Directions:
  • In a large pot bring to a boil water and sugar
  • Once boiled and sugar well dissolved, add lemon and lime juices and lavender
  • Set to cool to room temperature
  • Strain, transfer to a large jug and move to the fridge
  • Serve over ice and garnish with lemon slices and lavender sprig
If you don't have a big enough container for it, you can fill up a couple ice cube trays and freeze. Add to water for a bit of flavour or add back to the lemonade to keep your drink cool and not watered down.

Recipe adapted from exPress-o


What do you like to drink in the summer?

Don't miss a post! 
Sign up for email posts (found on the sidebar), like my facebook page, or follow me on bloglovin'. You can also keep up with my instagram feed and I occasionally tweet.

Let's get social


Thursday, 19 January 2017

How to Properly Visit a Gallery

We've all done it. Gone to a new museum and felt the need to get our money's worth by seeing ALL of it (even if it was free to get in). 

The slow walk through each room, pausing at every interesting looking piece, and reading text panels gets old quickly. Soon the slow walk becomes feet dragging, the pause happens less often, and we begin to fake read the text panels. Don't even get me started on some of those tedious audio guides. 

Stop it. Just stop it.

{ErinOutandAbout} Avoid Museum Fatigue: How to Properly Visit a Museum

Museum going shouldn't be a drag. A lot of hard work went into curating each display just to be ignored by you because you're tired and let's be honest, hangry. No good can come of this situation.

But fear not, I have a solution to combat the dreaded museum fatigue. (it's a real thing!)

Plan it out
{ErinOutandAbout} Avoid Museum Fatigue: How to Properly Visit a Museum

Before you arrive: if there is a particular exhibition you want to see, check out the website first and maybe even purchase your tickets online to avoid waiting in line. Also be aware, sometimes blockbuster exhibits are timed entry.

Once arrived with ticket in hand, it can be a good idea to coat check, if available. Winter in Canada can be glorious, until you are sweltering indoors lugging around your mitts, hat, scarf, and Canada Goose down-filled coat. Trust me, coat check. You will thank me for this in the end.

Favourite piece
{ErinOutandAbout} Avoid Museum Fatigue: How to Properly Visit a Museum

Okay, we've made it into our first exhibit space. Hurray! So far so good, no signs of museum fatigue just yet. 

Wander the displays at your leisure, only reading the panels that interest you most (you don't have to examine and read every single thing you can see. You aren't expected to).  

If you are visiting with someone, make a plan to meet in the middle of the room once you've both finished wandering and take a small moment to discuss your favourite pieces. Maybe even go back and visit those pieces together. 

Which brings me to my next point,

{ErinOutandAbout} Avoid Museum Fatigue: How to Properly Visit a Museum

Rest
{ErinOutandAbout} Avoid Museum Fatigue: How to Properly Visit a Museum

What I'm displaying in these two photographs are classic signs of museum fatigue. Feet hurting, shifting weight, losing interest in what I'm looking at. But still feeling the urge to continue. MUST. SEE. IT. ALL.
{ErinOutandAbout} Avoid Museum Fatigue: How to Properly Visit a Museum

Instead, be like this dude. The benches provided in exhibit spaces are not meant solely for the very young and the very old. Go on and have a seat yourself. Take a moment to be super contemplative about the pieces around you, or maybe take a #museumselfie if that's more your style. Either way, rest. Start back up again once you feel ready. No need to rush things.

{ErinOutandAbout} Avoid Museum Fatigue: How to Properly Visit a Museum

Visit the Cafe
{ErinOutandAbout} Avoid Museum Fatigue: How to Properly Visit a Museum

I am always up for a visit to the museum cafe (I heart a museum cafe!). I suggest about halfway through your visit follow the general ambient noises of coffee making and dishes clinking and get some caffeine in you, maybe a little something for the blood sugars, and rest those feet before heading back out there. You're bound to be hungry and it really makes a day of things.

Seriously though, going versus not going can mean the difference between a fabulous day out and ruining lives by not being able to take back what you said in hanger.

{ErinOutandAbout} Avoid Museum Fatigue: How to Properly Visit a Museum


That's how it's done, son!


What do you do to avoid museum fatigue?

Don't miss a post! 
Sign up for email posts (found on the sidebar), like my facebook page, or follow me on bloglovin'. You can also keep up with my instagram feed and I occasionally tweet.

Let's get social

Thursday, 5 January 2017

How to Tackle Lima

While planning our trip to Peru, I started discovering people I knew that had visited Peru themselves. And there seemed to be a resounding consonance, don't even bother with Lima. There's so much to do in this country that Lima will underwhelm.  After being there myself, I would like to politely disagree.

{ErinOutandAbout} Lima, Peru

{ErinOutandAbout} Lima, Peru

Lima was originally inhabited by indigenous groups and was incorporated into the Inca Empire in the 15th century. The Spanish then settled there in 1536. Today, the large city is made up of many neighbourhoods; Lima Centro, Miaflores, San Isidro, Barranco, and Chorrillos to name a few of the more commonly visited ones by tourists.

{ErinOutandAbout} Lima, Peru

{ErinOutandAbout} Lima, Peru

{ErinOutandAbout} Lima, Peru

Lima definitely can be overwhelming with it's size, the crowds, and even the traffic. There's no way you're going to see it all and that's normally how I try to see a city--by seeing it all. Lima cannot be conquered this way, instead it must be broken down to smaller bits and tackled on a smaller scale.

{ErinOutandAbout} Lima, Peru

{ErinOutandAbout} Lima, Peru

{ErinOutandAbout} Lima, Peru

After a little research we decided to focus our attentions on 3 of the main districts: Miaflores, Barranco, and Lima Centro. Before arriving, we weren't entirely sure how we were going to get about, but discovering that there was Uber we weren't too concerned.

We booked a hotel in the commercial district, Miaflores. Checking off walks to the ocean, learning about the pre-Inca culture at the Huaca Pucllana, and being close to other exciting neighbourhoods, like Barranco.

Barranco is a bohemian, relaxed district with great restaurants and nightlife. We often found ourselves drawn to this district and did a food tour here.

Lima Centro is the old downtown area where there are large squares and colonial buildings and lots of people. We took the Metropolitano there one afternoon, wandered a bit, grabbed some lunch and felt we had our fill.

{ErinOutandAbout} Lima, Peru

{ErinOutandAbout} Lima, Peru

{ErinOutandAbout} Lima, Peru

{ErinOutandAbout} Lima, Peru

{ErinOutandAbout} Lima, Peru

{ErinOutandAbout} Lima, Peru

{ErinOutandAbout} Lima, Peru

{ErinOutandAbout} Lima, Peru

{ErinOutandAbout} Lima, Peru

{ErinOutandAbout} Lima, Peru

{ErinOutandAbout} Lima, Peru

{ErinOutandAbout} Lima, Peru

{ErinOutandAbout} Lima, Peru

{ErinOutandAbout} Lima, Peru

Like I said, we didn't see nearly everything there and didn't even step foot into a museum, but having broken Lima down into smaller pieces, exploring a few neighbourhoods as independents, I feel like I now know what Lima is about and I like it very much.

This capital city has been given a bad rep for being so big and different then the rest of the cities in Peru, but it really does have it's own unique charm as it fights to be a modern city in a modern world. Go on, give Lima a shot.


Have you been to Peru or Lima? What did you think of it?

Don't miss a post! 
Sign up for email posts (found on the sidebar), like my facebook page, or follow me on bloglovin'. You can also keep up with my instagram feed and I occasionally tweet.

Let's get social

Thursday, 22 December 2016

Christmas Eggnog

Each Christmas my mum and I have a tradition. We pull out all the decorations and prepare for an evening of filling the house with Christmas cheer. Then on a night when we can devote full attention to the task with put on some of our most favourite Christmas songs and whip up a batch of eggnog before going at the tree with lights and tinsel.


My mum doesn't like the store bought variety because she finds it too rich and that's exactly why I love it and can drink the whole carton myself in an evening. Making it ourselves means we can control the amounts and how rich it will be. We've found a good compromise. Plus we add copious a dash of rum to make this drink more adult and everyone is happy.


Could serve 4 (but we usually go back for seconds, so I wouldn't really know)
Ingredients:
4-6 eggs
2 cups milk
1 Tbs sugar
1 cap full vanilla extract
dash of nutmeg
rum (optional, but really)

Instructions:
Throw all the ingredients into a blender, save the nutmeg, and blend til frothy.
Taste and adjust as needed. More egg will make it richer, more milk will make it less rich and add volume, more sugar will make it sweeter etc.
Serve in a fun glass (we often use a crystal tumbler cause we fancy like that) and top with a dash of nutmeg.
YUM!

Don't miss a post! 
Sign up for email posts (found on the sidebar), like my facebook page, or follow me on bloglovin'. You can also keep up with my instagram feed and I occasionally tweet.

Let's get social

Thursday, 10 November 2016

Inside My Pack: South America


South America Packing List

 The itinerary: 9 days total spent in Peru and 9 days in Bolivia, just prior to the onset of the rainy season; late September into early October.

I did so much research prior to take off, consulting the weather of the various cities I was to visit and still I struggled with figuring out what exactly to pack.

In the end, I realized I was putting too much stress on myself as to what I was putting in my suitcase, when really there was no need. If I forgot anything or required warmer clothing, I could easily buy items in the larger city centres I was traveling to.

Once I made that realization, it all became a lot easier and I was able to start packing. I kept a neutral colour pallet in mind (so things could be mixed and matched), the weather (so I would be comfortable), and my desire to keep things limited to the space available in my carryon bag (so I wouldn't have to lug around a huge suitcase).

Here's what I packed.


In my suitcase (which is a carry-on)

3 trousers
1 leggings*
3 tank tops**
1 windbreaker
6 shirts (most short sleeved or 3/4 lenth)
1 pashmina
1 sweatshirt
2 long sleeved shirts
1 spring coat
1 swimsuit
1 wool headband and gloves
1 warm pjs
1 small purse
1 fold up reusable bag
2 travel towels (one bath and one face)
travel laundry liquid
3 pairs of shoes: flip flops, slip ons***, and hiking shoes

*I ended up only wearing these once and really didn't need them.
**could have done with one less tank top, as I only wore two of them. The sun was piercing and the culture modest, I solely wore them as undershirts.
***Do over: I'd switch these out to some sneakers. 

Toiletries 
toilet paper*
facial cloths**
shampoo and conditioner
toothbrush and paste
sunscreen
face cream with SPF
foundation with SPF and other make up
chap stick with SPF
wet wipes
deodorant
razor
shower gel
hand sanitizer
bug repellent
band-aids
mini first-aid kit
medications: anti-nausea pills, anti-diarrhea pills, antibiotic ointment, chewable antacid, and Ibuprofen, after bite cream, altitude pills***

*Don't skip this one. Find the room in your bag no matter what. It's first on the list for a reason. I brought a whole roll. Smushed it down and removed the cardboard centre to save a bit of space. Used the whole roll over the course of the trip. Handy for loo visits, and shared with a friend.
**I had dry ones that require a bit of water for lather, however, I would recommend wet ones as I didn't always have access to water when washing up.
***Got a perscription from my doctor before leaving, but I'm told this can be picked up in country easily enough. 

small backpack* 
snacks; 4 cliff bars and 4 fruit bars
head lamp
sunglasses
lock
money belt
Soles and American Dollars**
warm socks
sleep mask
ear plugs
inflatable pillow
clear bag for liquids at security***
a good book/magazine
phone and charger
ear phones
travel journal and pencils
Spanish/English dictionary book
passport with copies
water bottle

*In this I packed the items that I'd want to have close at hand while flying
**I also required Bolivianos but didn't get any until I was in Peru.
***Pro tip! When doing international travel pre-pack your carry on liquids (all under 100ml) into an airport appropriate baggie and keep at the ready for a quicker security check. No hassel, no fuss, no muss. 

While visiting Peru and Bolivia I noticed a lot of people wearing traditional dress and others wearing western casual clothing. I didn't see  too many people dressed up or even all that dressy. Bringing clothes for a night out on the town would have been very out of place. The tourists, I noted were wearing activewear and comfortable walking shoes. These are not the streets of Paris.

Locals also know how piercing the sun can be in these parts. They are completely covered. Wearing long sleeves, hats and pants even in the heat of the day. Take their lead and cover up exposed skin and don't forget the sunscreen if you do happen to be caught with your elbows out.

I hope that is helpful to someone out there stressing about what and how to pack for there trip to South America.


Don't miss a post! 
Sign up for email posts (found on the sidebar), like my facebook page, or follow me on bloglovin'. You can also keep up with my instagram feed and I occasionally tweet.

Let's get social

Thursday, 3 November 2016

Salted Caramel Apple Cake

Last weekend, my mum and I visited Andrew's Scenic Acers, which was beautiful and very autumnal with it being pumpkin season (watch for a post to come). After taking some pictures of the photogenic pumpkin patches, we headed over to the apple trees and did some Pick-Your-Own apple picking.

{ErinOutandAbout} Salted Caramel Apple Cake

I'm not a huge fan of apple pie, but love apples. And cake. Solution! Apple cake. And what's even better than apple cake? Salted Caramel Apple Cake, that's what.


I adapted this recipe from The Reluctant Entertainer


{ErinOutandAbout} Salted Caramel Apple Cake

{ErinOutandAbout} Salted Caramel Apple Cake

{ErinOutandAbout} Salted Caramel Apple Cake

15 minute prep/1 hour cook/yields 12 pieces Ingredients: 

6 Tbsp butter (divided) 
1 1/2 cups packed brown sugar (divided) 
1 tsp sea salt 
4-5 apples, cored and peeled 
1 1/2 flour (I used whole wheat) 
1 tsp each of nutmeg, cinnamon, and allspice (or use 1 Tbsp apple pie spice) 
2 tsp baking powder 
1/4 tsp salt 
1/2 cup butter, softened (divided) 
2 eggs 
1 tsp vanilla 
1/2 cup whipping cream 

Instructions: 
1. Preheat oven to 350 degrees. Butter bottom of a 9-10 inch round cake pan with butter, then sprinkle 1/2 cup of the brown sugar and sea salt onto the bottom of the pan. 

2. Heat 2 Tbsp butter in a pan on medium high heat. Sautee the peeled, cut apples until soft. Stirring occasionally to make sure it doesn't burn. 

3. Mix together flour, nutmeg, cinnamon, allspice, baking powder, and salt. Add the butter from the apple pan, remaining brown sugar, eggs, whipping cream, and vanilla. Mix together until smooth. 

4. Place cooked apple in cake pan over sugar. Spread batter (it will be thick) over apples. Bake for 40-45 minutes. 

5. Run a knife around the edge of the pan to unstick the cake. Place a plate on top of the pan and flip over to transfer the cake to the plate with the apples on top. Serve at room temperature with some whipped cream on top (optional). 


Share with me in the comments below if you try making this delicious cake yourself or have your own favourite apple recipe!


Don't miss a post! 
Sign up for email posts (found on the sidebar), like my facebook page, or follow me on bloglovin'. You can also keep up with my instagram feed and I occasionally tweet.

Let's get social

Thursday, 20 October 2016

How to be a good travel buddy

Not everyone can travel with everyone else and even the bestest of travel buddies can have a moment of disagreement. Travel can be stressful. It can throw up twists and speed bumps that can cause, even the most seasoned travellers to flare tempers. Being a good travel buddy is a great adulting skill to learn, otherwise expect to remain a solo traveller whether you like it or not.

During our most recent trip to South America, Eimear and I made for good travelling buddies and I'd like to think it's because we have this travel thing hacked.

{Erin Out and About} How to be a good travel buddy


Give Space
Occasionally, there will be times when you or your buddy will need a moment to yourselves. Learn to read the signs when space is needed and freely give it, otherwise you might have a blowup brewing.

play mother 
Inevitably, someone will catch something and will need some tending to of some sort. That might be running to the store for meds, rearranging travel plans, or physically hoisting them up and dragging them to your next destination. Play mother to them and they will (hopefully) do the same for you.

Be Kind 
This is a general good rule to follow. No one likes a curmudgeon. Stress can make tempers short and your travel buddy may seem like the best person to take things out on. If that happens, cool down and apologise. Remember, they know where you're sleeping.

Compromise
No matter how great travel bffs you guys are, there will be times when you don't agree with each other. That's the time to find a compromise. Find a middle of the road or maybe agree to do things their way this time and your way next time.

Feed off each others strengths
I discovered something while in Peru, I'm terrible at Spanish (this wasn't a huge revelation, I kinda had an inkling it would be the case), but I'm okay at understanding prices and numbers. Eimear was a wiz with the maps, she would study them and situate ourselves and where the things we wanted to see. The only times we got lost was when I was navigating. Together we knew how much things cost and where we were going!

To know me, it so travel with me.

Do you have any good travel buddy tips to add?

Don't miss a post! 
Sign up for email posts (found on the sidebar), like my facebook page, or follow me on bloglovin'. You can also keep up with my instagram feed and I occasionally tweet.

Let's get social

Thursday, 8 September 2016

What to do When You're Not Having Fun Travelling


Bad Weather
Bad weather can cause a smile to waver and a mood to shift downward. Here you had such big plans for your trip and along comes the heavy clouds and cold winds to take it all away. But just like the US Postal service motto says 'neither snow nor rain nor heat nor gloom of night' should keep you from getting out there and exploring you city of choice. If it's raining, fight the #rainitis and get out there, just like Emma of Adventures of a London Kiwi who discovered how lovely Winchester could be even with a little drizzle.
Likewise don't let the cold stop you. Travelling in off seasons could mean less tourists and generally cheaper costs. So bundle up and book that winter vacation. Here are some tips for surviving a cold city break.

Bad Mood
Give your head a shake! What's the matter with you? You're on holiday! You're travelling! Still in a foul temper? Let's figure this out together with some self reflection. What's the reason for this poor humour? Are you hangry? Are little things not going your way? Where things not planned properly? Did you wake up on the wrong side of the bed?
Now let's find a solution: eat a snack, take a break, do some ground research, shake it off. Seriously, you are travelling, this is an amazing opportunity you have here. Indulge for a moment in a teeny tiny hissy fit, then suck it up, buttercup and move on.

Bad Travel Buddy
Maybe your travel personas are not syncing up. Maybe they've woken up on the wrong side of the bed, Maybe this is your first trip together and you're discovering you aren't great travel partners. 
Whatever the reason, take a little break from each other. Some alone time might help reset moods and when you come back together, forget the past and start fresh from there. 

Bad Money (just trying to keep with the theme. I know, I'm sorry)
You've arrived to a place and discovered that it's a whole heck of a lot more expensive than you had anticipated. Don't let this get you down, there is still plenty you can do to enjoy the city on the cheap. You can pick and choose what you spend your money on and find free or cheap things to do in your area, but really some travel experiences are worth it.

With the exception of actually something terribly bad happening, nothing is so awful that you can't find some enjoyment. Not every city is going to be THE. BEST. EVER. But trying to not be a complete grump about it will mean a better time for you and any and all travel buddies. Now let's turn that frown upside down!


Don't miss a post! 
Sign up for email posts (found on the sidebar), like my facebook page, or follow me on bloglovin'. You can also keep up with my instagram feed and I occasionally tweet.

Let's get social

Tuesday, 30 August 2016

Pre-Travel Safety Tips

As I announced last week I have some upcoming travel plans in the works. So this week I thought it would be good to go over some pre-travel safety tips, if anyone is like me and has a love/hate relationship with the planning stage (I only want to focus on the fun bits like what food I'm going to try there or what things I'm going to see, and just hope that the nitty-gritty details just work themselves out)

1) Get insurance
This is boring, but as the old adage says, it's better to be safe than sorry. No one wants to get caught out, especially while away from home. So just suck it up, buttercup and buy yourself some insurance that includes medical and cancellation. Some credit cards have this part of your policy, so look into it. It's cheaper and easier to get than you might think. 

2) Look into visas
Being Canadian I often just assume a visa isn't required for my travel destinations and this is more times than not a correct thought, but how much would that suck to arrive some place just to be truned back because I didn't do the research before hand. 
Some places may not require a visa, but might require specific immuniations to enter the country, so look into that too.

3) Write down your itinerary
Even if it's just a loose idea of where you will be when, it's a good idea to write this info down. 

4) Share it with someone
Now, with that itinerary you wrote down? Share that with a family member or friend not going on the trip with you. If something were to happen, someone at home would know where you should be and possibly how to get a hold of you if needed.

5) Get mail picked up/stopped/checked
This could be the same family member/friend as above. Ask them nicely to checkup on your place once in a while and collect any mail/flyers/newspapers on your doorstep.  

6) Tell bank
As I mention in this month's travel link up post: Money tips whilst traveling, tell your bank where exactly you will be going and for how long. This protects yourself against if fraudulent activity were to occur at home or as a result of your trip.

Want more pre-travel safety tips? Check out Simplisafe's fun pre-vacation checklist infographic below, created specially to be shared with dear readers like you. Simplisafe is a wireless security system that helps protect your home whilst you'er away. You can also check out their blog post about ensuring your home is safe while travelling internationally


Don't miss a post! 
Sign up for email posts (found on the sidebar), like my facebook page, or follow me on bloglovin'. You can also keep up with my instagram feed and I occasionally tweet.

Let's get social

Tuesday, 19 April 2016

How to Save Website Shortcuts to Your iPhone Home Screen

I love my iPhone* (other smart phones are available). Love it to pieces, but sometimes I just can't face clicking through all those buttons and links to access my favourite websites. I mean come on Siri, yes I want to open in safari.

Struggle no more!

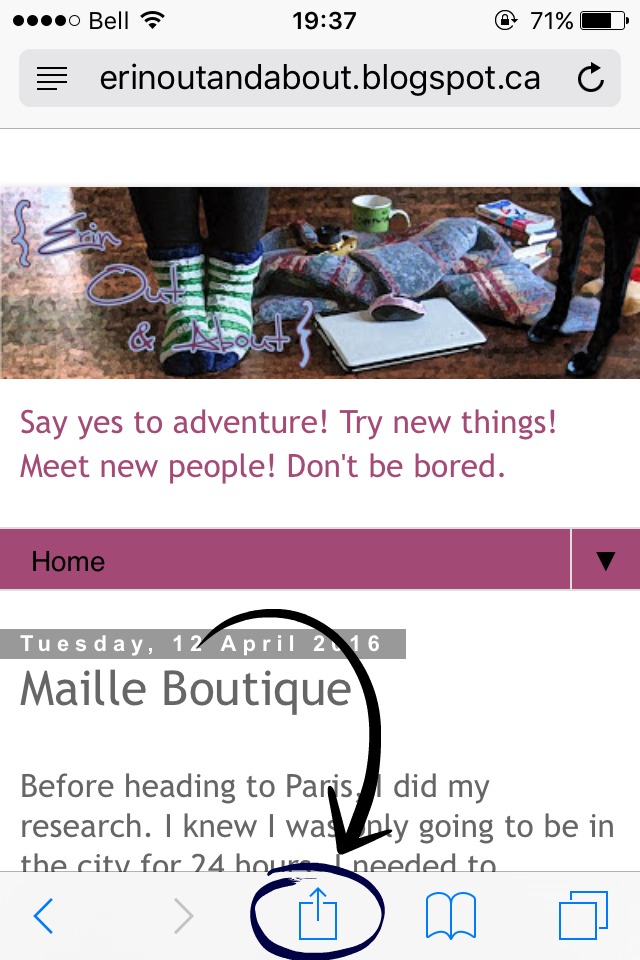
{ErinOutandAbout} How to save website shortcuts to your iPhone home screen

Firstly, open safari and go to your preferred website. Once there, find the box with the upward pointing arrow at the bottom of the screen. 

{ErinOutandAbout} How to save website shortcuts to your iPhone home screen

Once open scroll through it until you see the 'Add to Home Screen' button and select it.

{ErinOutandAbout} How to save website shortcuts to your iPhone home screen

Name the website whatever you like and click on add.

{ErinOutandAbout} How to save website shortcuts to your iPhone home screen

Lastly, enjoy your favourite website with ease of access.

{ErinOutandAbout} How to save website shortcuts to your iPhone home screen


*I use an iPhone 4 and these are the steps for it. As far as I can tell, these steps are still relevant. 


Don't miss a post! 
Sign up for email posts (found on the sidebar), like my facebook page, or follow me on bloglovin'. You can also keep up with my instagram feed and I occasionally tweet.

Let's get social


Related Posts Plugin for WordPress, Blogger...